Vendor Records
Vendor is a seller of goods. In other words, Vendor is a person to whom goods or services are purchased.
A Vendor Account is summarized record of various transactions pertaining to particular Purchase Account. All the transactions of Vendor Account are recorded under the Purchase Account.
To create Vendor Account, click on “Masters > Vendor”, the following screen will be appeared:
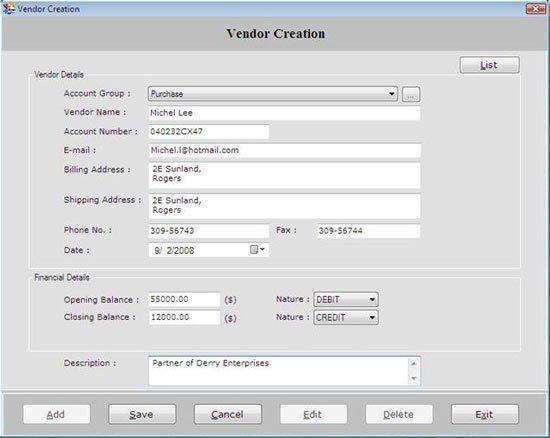
Vendor Creation screen is divided into three fields: Vendor Details, Financial Details and Description.
Vendor Details
This section contains the following fields:
- Account Group: Select the Account Group which has been created under Purchase A/C.
| To create or view the list of other Account Groups, click on the icon |
 |
-
Vendor Name: Enter the vendor name.
-
Account Number: Enter the account number. It is the unique identification assigned to each vendor.
-
E-mail: Enter the e-mail address of the vendor.
-
Billing Address: Enter the billing address of the vendor. A billing address is the address where you would like to have bill for purchase.
-
Shipping Address: Enter the shipping address of the vendor. A shipping address is the address where you want the item that was bought and delivered to.
-
Phone No: Enter the phone number of the vendor.
-
Fax: Enter the fax number of the vendor.
-
Date: Select the date when the vendor account is created.
Financial Details
This section contains the following fields:
-
Opening Balance: Enter the opening balance amount of the Vendor Account. This balance is entered at the beginning of financial year.
-
Nature: Select the nature of opening balance whether it is Debit or Credit.
-
Closing Balance: It is the remaining balance in the Vendor Account at the end of Financial Year.
-
Nature: Select the nature of closing balance whether it is Debit or Credit.
In Financial Details section that currency is displayed which has entered at the time of Company creation.
Description
Enter the special notes about the vendor.
After entering all the details, click on “Save” button to save the information.
This screen also contains the following buttons:
-
Add: To add new entry.
-
Save: To save the data.
-
Cancel: To cancel particular operation.
-
Edit: To edit existing records.
-
Delete: To delete the record.
-
Exit: To exit from current window.
-
List: To display a list of all existing records.
To view the vendor details, select the vendor from the list and press enter or double click.
To print the existing records, click on “Print” button. |
