Purchase Voucher
The purchase is the process of buying goods or services in exchange for money.
To create Purchase Voucher, click on “Voucher Entry > Purchase”, the following options will be displayed:
Purchase Register
Purchase Register Voucher is the legal document issued by the Company to Vendor for purchasing goods or services.
To create Purchase Register, click on “Voucher Entry > Purchase > Purchase Register”, the following screen will be appeared:
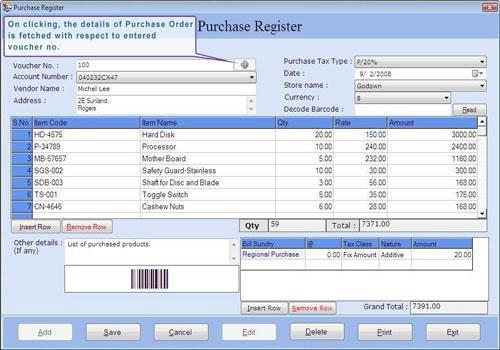
This screen contains the following fields:
Note-> If Barcode feature is being used then voucher number should be of minimum 3 characters.
-
Account Number: Select the account number to be affected on Purchase Register Voucher. In this list those accounts will be displayed which are under group of Sundry Debtors, Sundry Creditors, Cash-in-Hand, Bank account and Purchase account.
-
Vendor Name: This field displays the vendor name according to selected account number.
-
Address: This field displays the address of vendor according to selected account number or you can also enter the address manually.
-
Purchase Tax Type: Select the tax type for purchase. In this list those tax types will be displayed which are created under the purchase during Tax Type creation in Masters.
-
Date: Select the date of Purchase Register. By default, Date will be Current Date which can be set from Settings > Date Administration > Current Date.
-
Store Name: Select the store name where the goods are received after purchase. In this list those Stores will be displayed which are created during Store Creation in Masters.
-
Currency: Select the currency in which the transactions will be done. In this list, those Currencies will be displayed which are specified at the time of Company Creation (as called Primary Currency) and Currency Creation (as called Secondary Currency) in Masters.
Note-> If you select Secondary Currency then enter Conversion Rate during Currency Converter to make relation between Primary and Secondary Currency.
If you use the Barcode Scanner to read the barcode value then you don’t need to enter the barcode value manually.
Note-> This is the optional field through which you can save the time to enter the barcode information.
Item Details
-
S.No: This auto-generated field displays the serial number of item.
-
Item Code: Select the item code from the Item Code list and press Enter or Double Click. The selected information will be displayed with Item Name and Item Rate. (The Item Code list is displayed after pressing any key on the item Code field).
-
Item Name: Select the item name from the item Name list and press Enter or Double Click. The selected Item information will be displayed with item Code and item Rate. (The item Name list is displayed after pressing any key on the item Name field).
-
Qty: Enter the quantity of the item.
-
Rate: By default, the purchase price of item is displayed which is specified at the time of Item Creation in Masters or you can manually enter the purchase price of the item.
-
Amount: In this field the displayed amount is calculated by multiplying the quantity and rate of item.
Item Detail also consists of the following fields:
|
