Business Utilities
Home Contact Us Support Downloads Buy Now Solution Knowledgebase  

Business financial accounting and inventory management software create store group management report

Facebook
Introduction
Preface
About Financial Accounting Software (Standard Edition)
Software Features
Why DRPU Software?
What is Financial Accounting?
Why Financial Accounting Software?

Software Installation Guide
System Requirements
Installation Steps
How to Run Financial Accounting (Standard Edition)
Uninstallation Steps
Product Activation Process

Software Version Information
Version Details
Demo and Full Software Version

Software Interface Description
User Interface Startup Window

Working with Software Modules
Managing Company Records
Managing Masters Records
Managing Voucher Entries
Viewing Reports
Managing Software Settings

Advance Software Features
Voucher Filter Records
Export Report in Different Formats
Set Report Columns Width

License and Ordering
Ordering the product
License Agreement

FAQs and Troubleshooting
General Queries
Product Troubleshooting
Trial and Support

Getting Assistance
Online Help
Technical Support
Contact Information

Quick Reference
Glossary
Recommended websites
purchase order formats
Working with Software Modules
 

Store Management

A store is defined as a place where the stock is kept. Store may be Go Down, General Store and so on.

For Example: Pinnacle Hills and Northway, an electric equipment manufacturing Company, keeps the stock of Toggle Switch in the Go Down. Thus the Go Down is the store for Pinnacle Hills and Northway.

On clicking “Store” of Masters Menu, the following options will be displayed:


Store Creation

To create the store for the Company, click on “Masters > Store > Store Creation”, the following screen will be appeared:

Store Creation

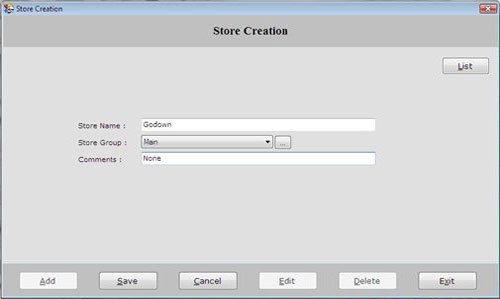
Store Creation screen contains the following fields:

  • Store Name: Enter the store name where the stock is to be kept.

  • Store Group: Select the Store Group which is created during Store Group creation.

  • Comments: Enter the special comment for the store.

After entering all the details, click on “Save” button to save the information.

The following buttons are used in Store Creation Form:

  • Add: To add new entry.

  • Save: To save the data.

  • Cancel: To cancel particular operation.

  • Edit: To edit existing records.

  • Delete: To delete the record.

  • Exit: To exit from current window.

  • List: To generate a list of all existing records.

If you want to view the detail of any created Store then select that store from the list and press enter or double click.

If you want to print the existing records, click on “Print” button.

Previous Next
 
 
Home | Contact Us | Support | Downloads | Sitemap | Terms and Conditions

© Copyright DRPU Software Pvt. Ltd.